Left handed 'Delonge' conversion!
Well this was a fun one! For quite some time now, I have been offering a pre-wired volume pot kit, made to match an awesome original 2001 Fender MIM Tom Delonge signature Strat I worked on, and do this kit for both right handed and left handed players to either restore originals or make their own delonge projects. These have proved to be really popular, and Tom contacted me as a result of seeing these kits to 'convert' his beloved Custom Shop LH Strat so he could easily swap loaded pickguards over for when he's in the mood to blast out some pop punk. As this was a factory single coil equipped strat, it did require some routing work, so I stripped all the existing hardware and planned out the routing.


Rather than route to my standard HB body route template, I wanted to remove as little material as possible, so made some measurements to ensure I could keep the route as minimal as possible. Just a little extra care to keep things neat and respectful to the guitar.

As a result I essentially worked to the 'pickguard cutout' spec route template for the bulk of the shape, then used my standard body route template to accommodate for the mounting legs of the HB.

Thankfully with the pickup being a short leg version, routing the side depths for the legs again allowed me to take off as minimal amount of material as possible overall.

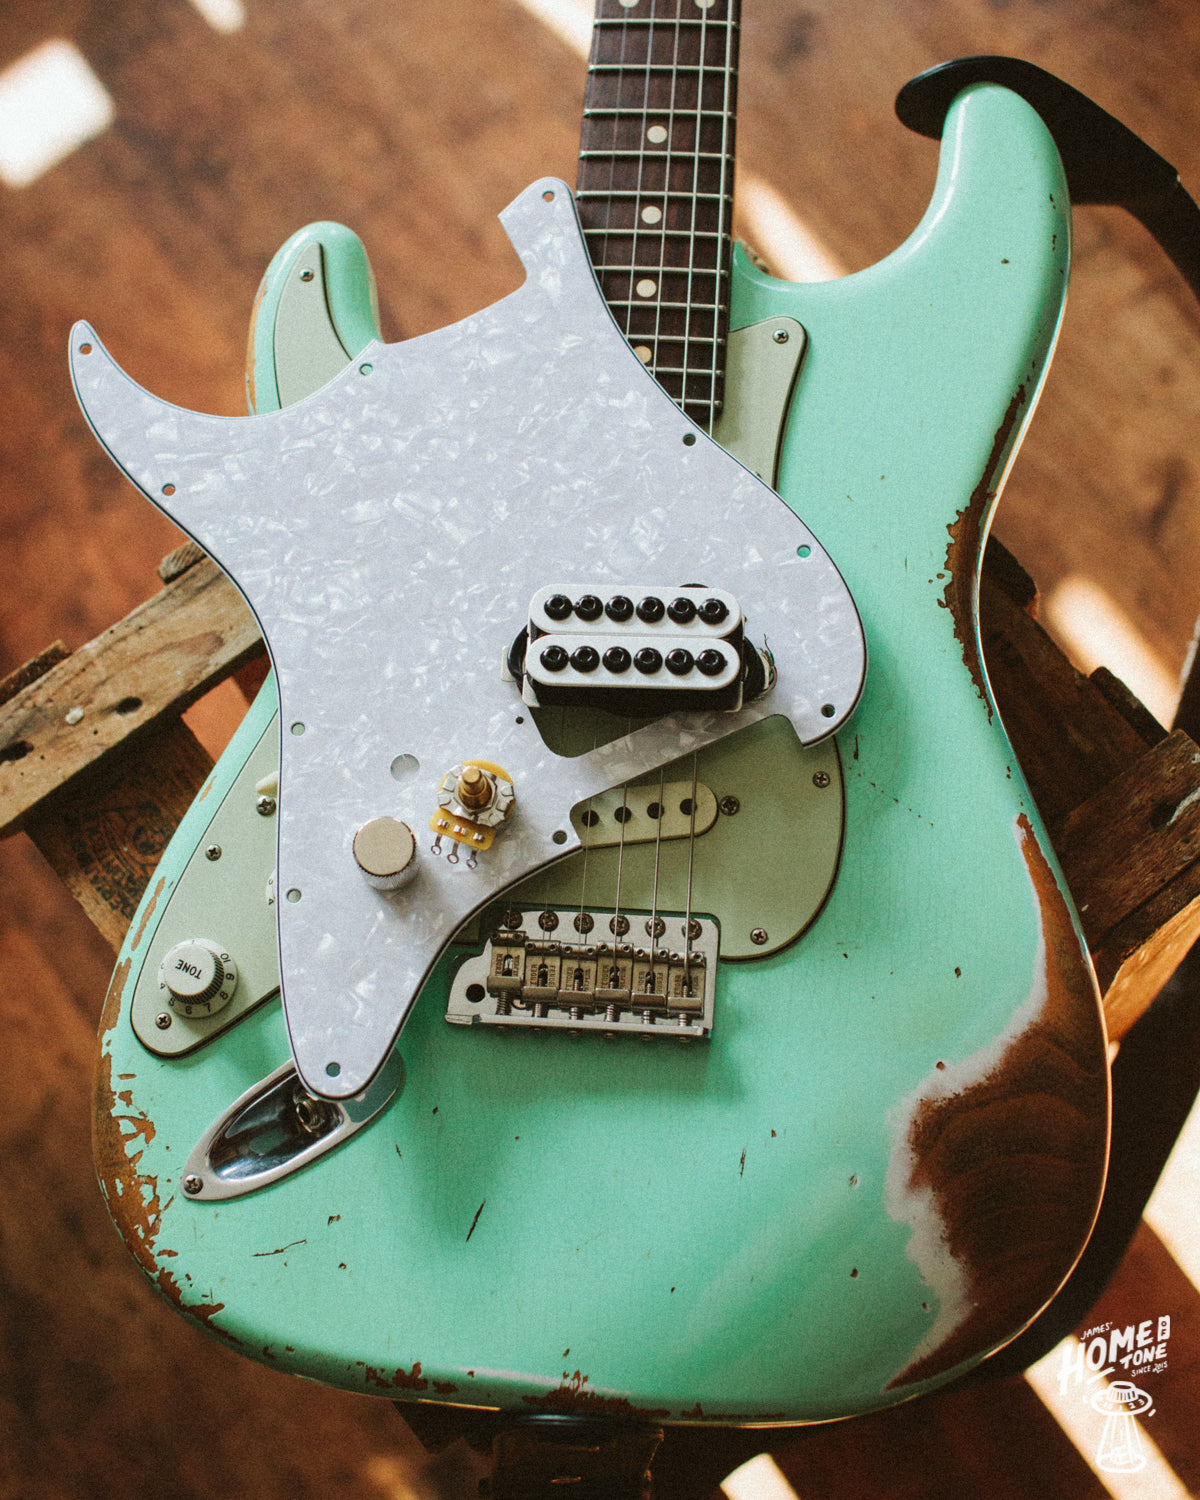
Then on with wiring up the pickguard. Tom supplied me with a lovely pickguard made by my friend (another Tom funnily enough!) at House95 Guitars, who makes a variety of Delonge inspired guitar items, sticker packs etc so well worth checking him out if you're into this too. Overall fit was lovely, with only one screw hole position needing a tweak which for a replacement pickguard is generally really good, alignment etc all bang on though so made easy work for me. I mounted up the Invader and set to work soldering my Delonge pre-wired volume.

For my LH spec kits I offer players the choice of a RH audio taper pot (clockwise rotation to increase from 0) or a LH/reverse audio taper pot (Anti-Clockwise rotation to increase from 0) depending on the specific players preference. Something I have found in the LH guitar community really has no clear spec, so players can come to prefer either over time. On this ocassion, tom prefers the Rh audio taper spec, so I used the CTS 450 series 'SSSP' spec 500k solid shaft pot, with the same spec 680pF/220kOhm parallel wired treble bleed that I discovered on an early TD Fender sig model whilst researching, along with Gavitt 22awg wire and a pure tone multi contact jack socket. Oh, and one of my brass, flat topped knurled control knobs too.


The final connection of the bridge ground wire will be done upon installation of the pickguard. One thing I didn't snap a photo of was the application of the copper foil shielding onto the back of the pickguard, but that was applied on request as the full cavity will also be getting the shielding treatment too.
So with the pickup and volume wired up, I could test fit the pickguard into the body to ensure the minimal routing carried out will fit.


Which I'm glad to say it did! So it was on with the shielding. Tom had asked me to shield the guitar, either with conductive shielding paint, or with copper foil. I personally recommended the copper foil on this occasion, mainly because there was some hand written Custom Shop markings within the factory cavities, and painting over that felt wrong really. So at least with the foil shielding, it can just be stuck over it and doesn't cover it permanently really. I use high quality, self adhesive and conductive copper foil shielding which works great. All you need to do is ensure pieces overlap, and that you check it over with the multi-meter afterwards to ensure continuity.


I did this across the whole cavity, so it will be optimal when he swaps it back to the Single Coil loaded pickguard too, and if you notice I add little overlaps so that when the pickguard is mounted, the shielding on the back of the pickguard correctly seats against the cavity shielding for continuity too. Ensuring all of this shielding work is effective and does it's job properly. With this done, I was able to solder the bridge ground wire, and fit the pickguard fully. It was then onto the setup! There was a few high spots on the frets to sort out first, so it had a spot level, re-crown and full polish. Along with the fretboard conditioned with MusicNomad F-One oil. Tom asked me to fix the bridge down, so I used all 5 vibrato springs and adjusted the retaining claw so that it sat nice and firmly against the body, instead of the usual floating bridge style. I personally didn't feel there was any need to 'block' it out at all, it was firmly in place as is.
The existing nut was a little oversized with deep string slots, but interestingly, the filed string slots were cut insanely high from the factory, basses as high as .012" for example (measured by fretting at the 3rd, and measuring between top of 1st fret and bottom of string). So after stringing up, bringing to tension and setting the neck relief, I set to work correcting the nut issues before commencing with the remainder of the setup.


The customer requested it to be setup on Curt Mangan 'The Pedal Show' edition Dan 11-52 strings, which were great I thought. Were super stable right from stringing up, so intonation was nice and easy as a result. I corrected the saddle radius for consistent action, with a smidgen of a balanced radius towards the basses to help with heavy playing on the power chords etc, and overall the guitar setup great after the issues were addressed.
So on with the final beauty shots! Cool project, and I like that with a few screws and three solder joints you can very easily swap between the two pickguards, so from classic 60s strat to pop punk weapon!


Rather than route to my standard HB body route template, I wanted to remove as little material as possible, so made some measurements to ensure I could keep the route as minimal as possible. Just a little extra care to keep things neat and respectful to the guitar.
As a result I essentially worked to the 'pickguard cutout' spec route template for the bulk of the shape, then used my standard body route template to accommodate for the mounting legs of the HB.
Thankfully with the pickup being a short leg version, routing the side depths for the legs again allowed me to take off as minimal amount of material as possible overall.
Then on with wiring up the pickguard. Tom supplied me with a lovely pickguard made by my friend (another Tom funnily enough!) at House95 Guitars, who makes a variety of Delonge inspired guitar items, sticker packs etc so well worth checking him out if you're into this too. Overall fit was lovely, with only one screw hole position needing a tweak which for a replacement pickguard is generally really good, alignment etc all bang on though so made easy work for me. I mounted up the Invader and set to work soldering my Delonge pre-wired volume.
For my LH spec kits I offer players the choice of a RH audio taper pot (clockwise rotation to increase from 0) or a LH/reverse audio taper pot (Anti-Clockwise rotation to increase from 0) depending on the specific players preference. Something I have found in the LH guitar community really has no clear spec, so players can come to prefer either over time. On this ocassion, tom prefers the Rh audio taper spec, so I used the CTS 450 series 'SSSP' spec 500k solid shaft pot, with the same spec 680pF/220kOhm parallel wired treble bleed that I discovered on an early TD Fender sig model whilst researching, along with Gavitt 22awg wire and a pure tone multi contact jack socket. Oh, and one of my brass, flat topped knurled control knobs too.
The final connection of the bridge ground wire will be done upon installation of the pickguard. One thing I didn't snap a photo of was the application of the copper foil shielding onto the back of the pickguard, but that was applied on request as the full cavity will also be getting the shielding treatment too.
So with the pickup and volume wired up, I could test fit the pickguard into the body to ensure the minimal routing carried out will fit.
Which I'm glad to say it did! So it was on with the shielding. Tom had asked me to shield the guitar, either with conductive shielding paint, or with copper foil. I personally recommended the copper foil on this occasion, mainly because there was some hand written Custom Shop markings within the factory cavities, and painting over that felt wrong really. So at least with the foil shielding, it can just be stuck over it and doesn't cover it permanently really. I use high quality, self adhesive and conductive copper foil shielding which works great. All you need to do is ensure pieces overlap, and that you check it over with the multi-meter afterwards to ensure continuity.
I did this across the whole cavity, so it will be optimal when he swaps it back to the Single Coil loaded pickguard too, and if you notice I add little overlaps so that when the pickguard is mounted, the shielding on the back of the pickguard correctly seats against the cavity shielding for continuity too. Ensuring all of this shielding work is effective and does it's job properly. With this done, I was able to solder the bridge ground wire, and fit the pickguard fully. It was then onto the setup! There was a few high spots on the frets to sort out first, so it had a spot level, re-crown and full polish. Along with the fretboard conditioned with MusicNomad F-One oil. Tom asked me to fix the bridge down, so I used all 5 vibrato springs and adjusted the retaining claw so that it sat nice and firmly against the body, instead of the usual floating bridge style. I personally didn't feel there was any need to 'block' it out at all, it was firmly in place as is.
The existing nut was a little oversized with deep string slots, but interestingly, the filed string slots were cut insanely high from the factory, basses as high as .012" for example (measured by fretting at the 3rd, and measuring between top of 1st fret and bottom of string). So after stringing up, bringing to tension and setting the neck relief, I set to work correcting the nut issues before commencing with the remainder of the setup.
The customer requested it to be setup on Curt Mangan 'The Pedal Show' edition Dan 11-52 strings, which were great I thought. Were super stable right from stringing up, so intonation was nice and easy as a result. I corrected the saddle radius for consistent action, with a smidgen of a balanced radius towards the basses to help with heavy playing on the power chords etc, and overall the guitar setup great after the issues were addressed.
So on with the final beauty shots! Cool project, and I like that with a few screws and three solder joints you can very easily swap between the two pickguards, so from classic 60s strat to pop punk weapon!