How-to guide - Installing a new pre-wired harness and pickup swap on a Bronco Bass
From the introduction of the Bronco Bass, it has been a popular modding platform. From basic pickguard swaps, to hardware changes too, but I'd say the most popular mods carried out are pickup/wiring swaps. This is mainly due to the subjectively, lower quality spec of components that it leaves the Squier factories with (understandbly for the price point of course!). Out the box these have a 6 pole Strat style single coil pickup hidden under the cover, although you can coax some usable sounds out of them, most bassists look for a little more suitability. For quite some years now I have also offered a 'US' spec wiring upgrade kit too. These kits feature quality CTS pots, a quality and sturdy Pure Tone multi contact jack, and just help get the most out of your pickup and controls. I offer these kits as just the pre-wired loom, but I also offer it as a fully pre-wired loom and pickup courtesy of the awesome specifically designed Broncomaster pickup. I had a Bronco come in for one of these swaps, so I thought I'd document the install for you to help with your own kit installs.

This pre-wired kit will fit the older Affinity and newer Sonic Series broncos, and this how-to guide will show you the step by step process of how to install the harness, and how to wire up the pickup. If you have purchased the full (pickup/loom all pre-wired) then the install is even simpler for you, you won't even need to touch a soldering iron! But for this article, I will be showing how to solder the pickup and bridge ground wire etc too.
Parts
Let's kick things off with what parts you'll need -

Signature Series Pre-Wired Bronco loom
Now of course you certainly could make your own loom, and I do plan on writing an article on how to make one from scratch for those too, but for this article which is focussing solely on how to install my specific upgrade loom into your Bronco, we're just looking a pre-wired kit here.
There are numerous brands and styles of pots you could use but for the sake of simplicity here, we're looking at 2x quality CTS '450' series 250k pots. CTS pots primarily are made to Imperial sizes/measurements, so for a far eastern made Squier Bronco, then you are going to have to make some small modifications to your existing pickguard, or replace the pickguard if you prefer. CTS pots have a mounting thread diameter of 0.370" / 9.4mm so I recommend for ease of install a pickguard with 0.394" / 10mm pot mounting holes are required. As standard I offer my Pre-Wired Bronco kit with 250k pots, these ultimately are the most common single coil bass pickup pot specs. But this can come down to personal preference too, there may be specific pickup requirements or your own personal requirements for a different pot spec.
I also offer the kit with the choice of split shaft, or solid shaft pots. This refers to the part of the pot where the control knob mounts. Again, due to these pots being imperial sized, and your original Squier fitted items being small metric sizes, you will also need to replace the control knobs which I'll get onto in a moment. The split or solid shaft spec all comes down to what style of control knob you hope to install alongside this kit.
Included in the pre-wired kit is a Pure Tone multi contact jack socket, 'mustard' style tone capacitor and it's wired together via quality Gavitt wire.
If you need to purchase my Pre-Wired Bronco wiring kit for this job, you can do so via my online store HERE.
Control Knobs
As touched on in the above info, retrofitting this 'upgrade' or US spec parts kit to your Bronco will mean you'll need 2 new control knobs to suit the different sized pots. The original control knobs will be suitable for smaller diameter, metric sized pots and therefore won't fit onto the new CTS imperial, larger diameter pots.
I offer the kit with either split shaft, or solid shaft fittings which is basically referring to the part of the pot where the control knob grips onto.

On the left is a solid shaft CTS pot. These pots will fit control knobs suitable for 1/4" (6.35mm) that secure in place via a grub screw.
The pot on the right is a split shaft CTS pot. These pots will fit control knobs suitable for 5.95mm 24 splines that secure in place simply by adjusting the split and push-fitting onto the pot.
I stock a range of suitable control knobs on my website, each of which noting in the description which CTS pot they are suitable for. Hope this helps!

Pickup
There are of course a wide choice of pickups you could fit to a Bronco bass. But this article is specifically talking you through the kit and products I offer, and for the Bronco that is primarily the specifically designed Bronco and Musicmaster upgrade by McNelly Pickups, the Broncomaster! This is a direct size replacement, double pole design, making the absolute most of the small footprint with the chunky coil going right up to the edge of the bobbins and a double pole piece per string design like a P-Bass split coil or Jazz Bass pickup design has for example. I offer these with a new cover supplied, black or white, or of course if you like the no cover look too, then you can fit it that way no worries. These can be ordered on their own as a standalone replacement, or as already mentioned, supplied and pre-soldered to my longstanding Bronco Pre-Wired harness kits.

Tools
I'll try to keep this to the bare essentials needed for carrying out this task, but when it comes to specialist tools, the more the merrier I say!
Minimum 40W soldering iron
I say a minimum of 40W as most solder wire you can buy these days is lead-free, and lead free does require a hotter iron/working temp due to it's higher melting point. A 40w Iron should achieve a working temp of somewhere around 400 degrees C, which is great for lead free soldering and in particular making your ground connections (pot casings etc).
Solder wire
There are varying specs, and quality of solder wire available. If it helps, I personally use Rapid/R-Tech Premium lead-free 22SWG 0.7mm. It has a flux core so you don't need to use flux additionally, but overall I find this to be a good lead-free solder wire to use for guitar/bass wiring work. Techs/luthiers etc tend to have their own preferences though, but this is what I use everyday so hope this helps narrow down your search. Ideally use this in conjunction with some form of fume extraction, or in a well ventilated area. Although lead-free is of course, as the name suggests, the fumes from the flux is still pretty nasty really, so best to think about how to do all of this safely.
Small or Needle nose pliers
These are really helpful for any wiring work, such as handling smaller parts that your fingertips might struggle to grasp, simply placing onto a wire to keep still whilst soldering a joint or using to shape/bend wires for installation for example.
Wire snips/cutters
You'll need some cutters to trim your wire length, if you have some guitar string cutters for example those might be useful here too for example.
Socket/spanners
This will be used to tighten the CTS and Switchcraft / Pure Tone jack mounting nut when fitting the pots and jack to your control plate and also used to remove the old pot and jack mount nuts too.
Philips screwdriver
This will be used to remove/re-fit the pickguard and pickup.
Small flat head screwdriver or Allen key set
This will be used if you have grub screw secured control knobs for example. Many of these traditional control knobs have a small flat head grub screw to secure the knob to the pot shaft. Some however have allen key grub screws so inspect what control knobs you have and go from there. What size you need will depend on the specific control knobs used.
Drill w/step cutter drill bit (or 10mm straight bit)
This will be used to widen the holes in the pickguard to mount the CTS pots and Pure Tone jack socket. I personally highly recommend using a step cutter bit to do this, but it can be done with a regular drill bit if that's all you have.
Multi-Meter
These are of course useful for a number of tasks, but primarily here it's useful to test the continuity and effectiveness of your copper foil shielding that will be applied. To measure your pots (and if capable, your capacitor value too) to help ensure they're within tolerance and/or the specs you wish to use. As well as testing continuity for your ground connections too. They're always handy to have around for any guitar wiring work though.
Wiring style/schematic
So with the parts prepared let's start by looking at the schematic. The Bronco I promise it's a nice and simple one.
To view the wiring schematic for a traditional right handed, Bronco Bass click HERE
Stripping down the bass
First thing you'll need to do here is strip down the bass so you can install your new components. 
The Bronco we're featuring here today is a pretty early example of the Affinity series Bronco. The bulk of features are the same throughout the Affinity production run as well as with the Sonic Series version too, but things like the main body cavity for example is slightly different to the smaller, with neater smaller cavities seen in later models. Thankfully the exact same install process is used throughout these models and changes though, so don't be alarmed by any visual differences. The install should be the very same.
When I supply the FULL pre wired Bronco harness/pickup kits, I pre-solder a new bridge ground wire to it for you. It is up to you whether you use this new bridge ground wire, or not. If you have a secure bridge ground wire already in place, the install will be slightly easier for you if you retain that wire. If you want to use my new wire, then please note that you will need to slacken/remove your strings, and remove your bridge from the body.
If you want to use the original, pre-existing bridge ground wire then you can carry out this pickup/wiring swap without even de-tuning your strings. Everything is pickguard mounted on the Bronco, and that will all lift right out without removing or even de-tuning your strings. So if you don't plan on swapping strings, having a clean up, or replace the bridge ground wire then leave those tuned up and get right on with the re-wire.

First up, I'll be removing the control knobs so I can access their mounting nut. Broncos generally leave the factory with Telecaster style barrel saddles. Some are push-fit, meaning they will just lift off the pot shaft (maybe with ease, maybe with a bit of encouragement!). But some like this one, have a single grub screw per control knob which you'll need to loosen before it'll lift off. On this ocassion it was an allen key grub screw, I have seen them with small flat head grubs though so just visually check which you have and go from there. With those loosened, I could lift them off with ease and access the pot mount nuts.
Using the sockets already prepared, loosen the pot and jack mount nuts.

With the pots and jack loosened, grab your screwdriver next and loosen the two pickup adjustment screws completely.

Now continue on with the screwdriver and remove all of the pickguard screws. This will allow you to lift off the pickguard and it'll leave the wiring and pickup parts inside the cavity.


Here's our first glance at the Squier factory wiring. I will note again (something I briefly mentioned in the introduction earlier) that this particular Squier Bronco has cavity/routing that isn't like what you will see under the hood of a more modern production Bronco. This is a much larger cavity, whereas the newer ones are far simpler and smaller, with only an open cavity in the pickup and harness area. None of this affects the install/rewuire procedure though, just mentioning it so as to not cause alarm of yours looks a little different under the hood.

So let's look at the wiring and what we need to do to begin removing it from the body for the full re-wire. Your specific Bronco may be a little different to this, but the core steps to follow are the same. What I mean by that is that the specific pots used by the factory during the different production runs may vary a little. This one did of course have metric type pots, but they were the full sized casings, whereas you'll usually find mini pots in the newer versions. The processes are the same regardless of this though, so don't be alarmed if things look a little different.
As this article is focussing on fitting a full pickup and harness replacement, I won't be covering removing the pickup from the original harness. So please bare this in mind if you are fitting another companies kits.
So! First we need to identify which wire is the bridge ground wire. This wire will normally come out of the body somewhere in the lower area of the cavity nearest the bridge, and it'll head into the cavity and then soldered to one of the pot casings. As noted in the introduction, on the full pickup/harness pre-wired kits I supply a new pre-soldered bridge ground wire. You don't neccesarily have to use this pre-soldered wire, I just add it in case you want or need to use it.
If you are planning to retain the factory/existing bridge ground wire, then it might be wise here to do a quick continuity test with your multi-meter to check it has good contact with the bridge plate. It is easier to do this whilst it's attached to the old harness.

So grab your multi meter, pop it onto the continuity test setting and place one probe on the bridge plate itself, and then place the other probe onto the pot casing where it is soldered to. If you get a beep, then you know the wire is nice and secure underneath the bridge and has good contact with it. If it doesn't then it has either come loose from underneath the bridge, has a break in the wire or isn't soldered well to the pot. If it is good, then you really don't need to replace it, you can leave it in situ and re-use it.
If there was a continuity issue, or if it was fine and you just want to replace it, then you'll need to slacken or remove your strings. With a screwdriver, remove the bridge plate mounting screws and lift off the bridge plate. Sandwiched between the body and the bridge will be a piece of wire. You can pull this out from the cavity side and remove it. You can now feed through the new length of ground wire, ensure the wire core is exposed and simply sandwich that core wire between the bridge and the body and re-fit your bridge plate.
If you are retaining the original wire, you will be good to now snip or de-solder this wire from the harness.

With that single bridge ground wire snipped and removed from the harness, this should now allow you to completely lift out the harness and pickup assembly. Some broncos do have additional ground wires, for example a wire from the harness and screwed into the body cavity. To be totally honest, these rarely do anything effective, most factory cavity shielding paint doesn't work as intended, but you can either remove this cavity ground wire (if it even has one) or snip it from the harness and keep it in situ to re-attach to the new harness later on. Simply follow the same process as above, snip off the wire and separate it from the harness.
Prepping the pickguard

Now time to concentrate on preparing the pickguard for the new parts. With the original pots and jack being slightly smaller mounting thread diameter, due to being the smaller metric spec parts. We first need to widen the holes in the pickguard to accomodate the new jack and pots. This can be easily done with a drill bit, or better yet, a step cutter drill bit. The step cutter is a more controlled way of widening holes in pickguards or guitar bodies. You'll need to widen the holes to 0.39" / 10mm. This will allow for the new parts to mount up perfectly.


The step cutter bit will usually have markings for each diameter size, so widen to 10mm and you'll be good to go! Step cutter bits allow for safer, more controlled cuts, but if you only have a straight drill bit, take your time and ensure it doesn't snag and cause tears in the pickguard. Some even opt to run the drill backwards to cut slower. Or if you have some scrap wood etc, pop the pickguard against that so you have a flat surface to drill against and try that for a more controlled initial cut.
Mounting the new parts

With those holes widened, we can now attach the pots and jack, so grab your sockets again, place the pots through the correct size drilled holes and tighten the mounting nuts. Be careful when tightening the mount nuts for the pot and/or jack that you keep them nice and central and still, so you don't twist/rotate the parts and put strain on the wires. Hold them still and tighten, you'll be good to go.

Now I can fit my new control knobs for the CTS pots. As touched on earlier in the article, the smaller Squier originals won't fit as they'll be smaller than what's required to correctly fit the CTS pots used in the Bronco pre-wired kit. So you'll need a pair of control knobs that suit either 1/4" / 6.35mm solid shaft pots, or 5.95mm 24 spline push fit control knobs depending on which spec kit you chose to order. On this ocassion, it is a kit made with solid shaft pots per customers request, so I need to tighten the control knob onto the pot shaft via a grub screw on each one.

With the harness mounted up, it's time for the new pickup! The new McNelly Broncomaster comes with pre-tapped baseplate and a new pair of mounting screws/tubings. First off pop the mounting screws through the pickguard, then push on the height adjustment tubing. Doing this will hold the screws in situ too.

You can then pop the pickup into position, and carefully begin to thread the mounting screws to the pickup.

Soldering the pickup
Now, I would say 99% of Bronco harness and McNelly Broncomaster pickup kit customers/orders opt to have me pre-solder the pickup to the harness for you. So if that is you, and you have a completely pre-wired kit sat in front of you, then you can skip this next stage. If you only have my Bronco harness, and are fitting it alongside another pickup, or opted to have me supply the McNelly pickup separately, then you will need to follow this next step.

So, over to the soldering iron. First up I'll want to cut down the wires to a more suitable length. So I refer to the cavity routing and see where I need the wires to go, and line it up to the volume pot. The pickups 'hot' wire needs to be soldered to the volume pot input lug so make sure you trim that wire long enough to reach that. The ground wire needs to be soldered to the volume pot casing, so trim that to suit.

With those wires trimmed to length, I'll now prepare for soldering. You may find it useful to 'pre-tin' your connections, particularly for the ground connection to the pot casing. To do this, get your iron up to working temp (I personally use an iron set to 400 degrees for fast but efficient ground connections using lead free solder wire) then place the clean iron tip on the pot casing in the area you plan to flow solder. Do this for a few seconds, then begin to flow a little solder wire onto the iron/surface. You should see the solder take to the surface providing it is warmed enough. This really should take long, 5-10 seconds tops. If you are battling here and it's just not flowing, remove the iron from the pot and let it fully cool. Then make sure your iron tip is clean, check your iron temps and try again.

With a little pre-tinned area, I can now make my ground wire connection.

Place the wire onto the pre-tinned area, then with your soldering iron, place the clean tip onto the wire, let the connection warm and flow your solder to finish. Keep the connection still until it has cooled to help prevent a cold/bad joint.

Now to solder the pickup hot wire. This is generally easier than making ground connections, as the lugs on CTS pots are super easy to flow solder onto, you won't need quite as high a temp, perhaps 350-375 degrees with lead free solder for example. Pop the wire into the input lug of the volume pot, place the soldering iron with a clean tip onto the connection, let it warm a moment then flow a little solder. You shouldn't need loads of solder here, otherwise it might run down the lug. Once the connection is done, let it stay still and you're done.
Soldering the bridge ground wire

Full pre-wired kit readers, you can join back in!
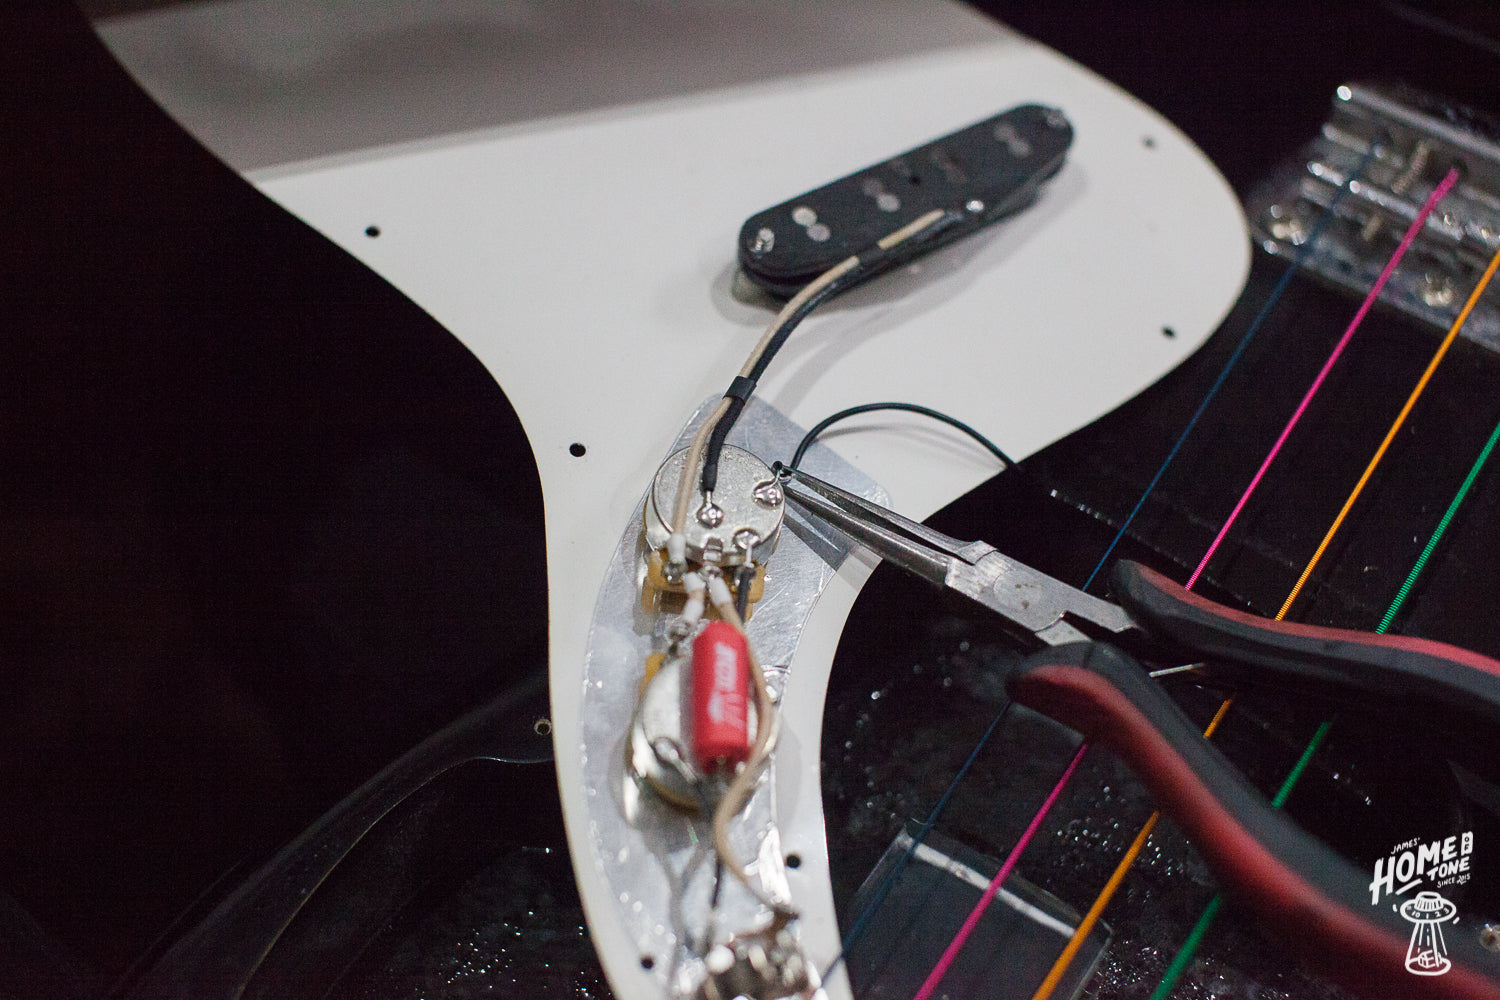
So at this stage, we have the soldered pickup and harness all connected up and mounted to the pickguard. Here we will be soldering your bridge ground wire to the harness. If you skipped the prior step, then here I have pre-tinned a little solder area of the pot casing. To do this, place your clean iron tip on the pot casing surface. Allow a few seconds for the surface to warm up, and flow a little solder. If the surface is warm enough, you'll see the solder 'take' to the surface easily. This really should take long, 5-10 seconds tops. If you are battling here and it's just not flowing, remove the iron from the pot and let it fully cool. Then make sure your iron tip is clean, check your iron temps and try again.

With your pre-tinned area, place your bridge ground wire onto it, place your clean iron tip onto the joint to warm the connection then begin to flow some solder. Keep the connection still after you've finished to ensure a nice happy solder joint. And you're done! All your soldering is now finished up and you can do some quick tests before assembling. You can pop the pickguard onto the body if easier for you, or keep it outside of the cavity. Plug it into the amp and tap test the pickup, turning the volume and tone controls as you do so. If you still have strings on the bass like this photo example, you can simply play a string etc. If it's all working as intended, you can crack on with fixing the parts back onto the body. If there's an issue, then you'll need to check some basics depending on the exact issue. No signal at all, check your leads plugged in, check the key wire connections between the jack and volume pot, and the pickup is connected correctly etc. If it's working but incredibly noisy for example, grab your multi meter and do some ground continiuty checks, and check all your ground soldering connections like the pickup and bridge ground for example.

I can place the pickguard back onto the body and begin to re-fit all of the pickguard screws. I'm all done for the job and ready to play this bass to test and enjoy it's new sounds.
I hope this article helps with your own Bronco pre-wired harness and/or Broncomaster pickup kit install. If you are a Home of Tone customer and have ordered one of these kits, if you have any questions just let me know directly via e-mail, as sometimes blog comments might get missed day-to-day.
Many thanks!
James
Have you made good use of some of the free resources here? Perhaps you might consider kindly supporting this free resource for guitarists via 'Buy me a coffee'! Thank you so much!