
How to Guide - Fitting a Pre-Wired Harness to a Stratocaster!
With every pre-wired harness I ship out, I supply a handy fitting guide with tips and key points to follow to make the install go as smoothly as possible, alongside a simple to follow wiring diagram. But, and understandably of course, sometimes translating that info to the real world when the soldering iron is smoldering away can be a little daunting if you're not used to it. So I've wanted to create a step-by-step guide to fitting one of my Home of Tone pre-wired Stratocaster harnesses!

For the most part, players opting to upgrade the wiring in their guitars are doing so on import models. I wanted to reflect that in this guide, so rather than get a USA made Strat for this demonstration, I've decided to show this process on an import instrument, this one in particular was a Strat copy by 'SX'. Why? Well very often there can be some little hurdles along the way with upgrading an import type instrument to USA spec components, which I'll cover in this guide. If you're fitting a new pre-wired harness to a USA built instrument, then the general processes will be the same, but there will be a couple less steps you'll need to do! Enjoy a sip of tea and a biscuit during those steps while the import guys carry on!
Recommended tools -
- 40w Soldering iron
- Lead free solder (I personally use Rapid 22SWG Lead-free 0.7mm diameter solder)
- Cross head screwdriver
- Wire cutters
- Small nose pliers
- 13mm socket
Always keep your soldering iron tip clean by using a damp sponge and/or if possible, some brass wool soldering iron tip cleaner. This ensures a good, clean solder joint.
Step One - Remove strings and pickguard screws.

About as simple as it gets here! Have your tools and new parts prepared and ready, makes life a lot easier than frantically looking for the screwdriver or reel of solder last minute all stressed out. Then remove all of the pickguard screws, jack plate screws, control knobs and switch tip. If you're keeping your existing pickups (like we are on this install) then you can leave the pickups mounted to your pickguard.

Here we have a first hint of the lower quality components we'll be replacing on this guitar. The pots on this are slim, 6mm shaft items, which is something we'll need to address in the following steps. Now you've removed all of the pickguard screws, control knobs and switch tip we can move on to step two.
Step Two - Removing loaded pickguard from the body

The bridge ground wire on this guitar was really short, so turning the pickguard over to inspect the existing harness was tight! I've decided I'm going to replace the bridge ground wire on this guitar to make doing this easier in the future, but for now, here we are looking at the original components. The bridge ground wire on this guitar is yellow, but for most brands it tends to be a black wire. Follow the wire that comes from the body to where it is ground on the existing harness, usually to the back of the volume pot like it was here. I'll be snipping that bridge ground wire at the pot end, ready to begin the removal of the original wiring.

To complete the process of removing the original loaded pickguard from the guitar to carry out the main harness swap, you'll need to snip the wires to the original jack socket. Lift out the jack plate, and simply snip the wires at the jack connections which will allow you to pull the jack wires through the body cavity and ultimately mean you can now lift out the full loaded pickguard from the body.
Step Three - Removing the pickup wires from the original switch
Now the pickguard is removed from the body, we can comfortable work on replacing the harness. I much prefer doing this away from the body of the guitar, it reduces the risk of any accidental damage to the guitar's body, as it can so easily be done. Dropping tools on it, getting solder marks, general surface scratches etc, it is much better if replacing the full harness to do it separate from the body which is great with a modular design like the Stratocaster as you can easily do this as demonstrated here.
The first step here is to remove the pickup wires from the original switch. On this guitar, we are retaining the original pickups, so I'll leave those mounted to the pickguard and simply follow the wires from each pickup to the existing 5 way switch. On this guitar they are easily identified by colour coded wires, but not all Strats will look like this. I'd usually just expect to see a white and black wire from each pickup, white usually denoting the Hot pickup wire, and the black for ground. But lots of pickup manufacturers use different colour codes. If you're unsure, a quick google search for your pickup manufacturers wiring colour codes will help you find the info needed. If it helps you when it comes to re-installing, you can label the wires too.
Simply snip the pickup wires right at the switch connector tab, and also snip the pickups' ground wire (usually ground at the back of the volume pot) which will then separate the pickups from the harness getting you ready for the next step.

Step Four - Removing the original harness from the pickguard and widening holes if required

Now we can remove the original harness in it's entirety from the pickguard. You'll need a screwdriver to remove the 2x screws mounting thr 5 way switch, and a small socket for removing the original 3 pots. I've added the photo above just as a side note, as you may note the pot is stamped 'B250k'. The B denotes that the volume pot is actually a Linear taper pot, which if you've played a guitar with a linear pot in the volume position before, it acts almost like an on/off rather than a gradual change in output volume. The human ear hears in a logarithmic pattern, so a linear change isn't as noticeable to us which is why many players (myself included) prefer to use logarithmic/audio taper pots in guitar's to help with gradual adjustment of volume and tone. So already it's very clear replacing these components is going to be a good upgrade over it's original items.

The original pickguard holes for the pots are quite small, and won't fit the new CTS pots on the upgrade wiring harness. So we'll need to widen the holes in the pickguard to fit the new harness correctly. I personally highly recommend doing this safely with a step cutter drill bit. This will cut the hole in the plastic much easier without the risk of tear out which could happen easily if using a normal drill bit. Normal drill bits can snag easily on plastic pickguards, so it's not worth risking damaging your pickguard and having to replace, if you can simply use a step cutter bit and do it right and accurately first time. You'll need to make the holes 10mm wide to facilitate the CTS pots. So I mark out the 10mm measurement on the step cutter bit with some masking tape, to help ensure I don't drill too far, and get to work!

The pickguard is now ready to mount the new upgrade pre-wired harness.
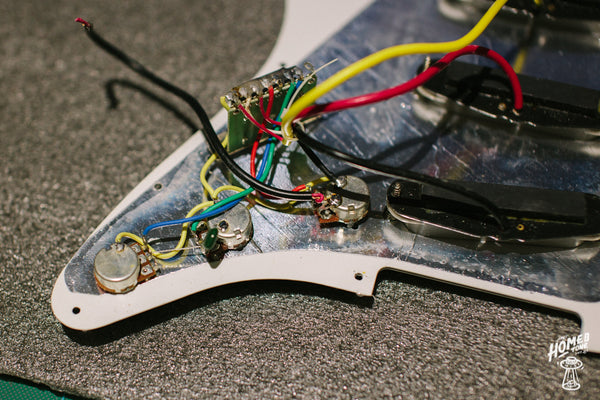
Step Five - Mounting the harness

As this is a relatively budget import guitar, and it's also going to be keeping the original pickups, it didn't really feel neccessary to go all out with a Signature Series spec harness, so we opted for an Entry Series here to provide a really high quality upgrade but with a couple of more wallet friendly options to suit the budget. The Entry Series for a Stratocaster features an Oak 5 way switch (as found on American made Fenders for example), Orange Drop 715P capacitor and Switchcraft mono jack socket (a quality industry standard component). The Signature Series would feature a CRL 5 way switch (often seen on Custom Shop Fender Instruments), USA made paper in oil capacitor and a Pure Tone multi contact jack socket (a quality, multi contact/improved surface connection). So a couple of options depending on your requirements and budget. Both feature my favourite CTS 'TVT' Series 250k audio taper pots and German made 22AWG wire as standard.
With the new harness mounted up, it's time to wire up the pickups and get it all back to one piece step by step!
Step Six - Re-Wiring the pickups to the new harness

If you labelled your pickup wires previously, then this step is nice and simple for you. As I mentioned previously, this guitar had a yellow, red and black outer sleeve for each pickup keeping it simple. But for many Strats it will be a white 'hot' wire for all three pickups, so it's best to work one by one to ensure you're wiring the correct pickup to the correct switch lug. I always start from neck pickup backwards, so let's see how that looks on the switch.

You'll notice on your pre-wired harness, that the side of the switch closest to the pots has already been soldered. Those go to the corresponding volume and tone pots. You'll see on the outer side of the switch, that three lugs are empty, these will be where you pickup hot wires are soldered to. Starting with the neck pickup's hot wire, I attach that the the right side empty lug. Then working to the left (as per photo's angle), it is then the middle pickups 'hot' next, and finally on the far left, the bridge pickups' hot wire.

Here are all three pickups' Hot wires now soldered to the switch. Now onto the ground wires. On this particular guitar, each pickup had some outer braiding for their corresponding ground wire, so I twisted all of those together ready to ground them to the harness. On other Strat types, you will usually see an individual black ground wire per pickup, these don't have to be wired in any order as they'll all just be soldered together, to ground.

On this guitar though, sadly the braided ground wire wouldn't reach the pots, so I needed to extend the wire suitably. I simply cut a length of black 22AWG wire, twisted it around the braided ground wires from all three pickups and soldered. To finish I simply added some heat shrink to help protect it. Then I was able to continue with soldering the pickup ground wire(s) to the back of the pot. As the nearest pot to this is the volume, most people solder it there, but you can of course solder this ground wire(s) to the back of any of the pots in the harness.

There we have it! The harness and pickups are now all wired up and ready to move onto the final stages of the install. You can now get the guitar body back on your work table, and place the loaded pickguard on the body. When you do so, you can feed the ground and hot wire for the jack socket through the small hole near the jack plate cavity, ready for the next step.
Step Seven - Wiring up the jack socket

Here we'll use a socket to remove the old, low quality jack socket, and install the new Switchcraft mono item.

For a normal, mono jack socket install, you'll see the jack socket has two lugs. One slightly larger, one smaller. The larger of the two is your hot connection, and the smaller is your ground. This is also shown on your wiring diagram supplied with the harness too. This is straight forward when you look closely at the jack socket, as you'll see the small lug is attached to the central part of the jack socket which is the grounding when the jack lead is plugged in. Attach the relevant wires to the correct lugs, and solder the joints. As with all solder joints, heat the joint first then apply your solder sufficiently.

You can now fit the jack surround plate to the body again with the two mounting screws, this section is now finished!
Step Eight - Soldering your bridge ground wire to the harness

If you remember back towards the beginning of this fitting guide, I mentioned that the original bridge ground wire was really short, making it difficult to remove the pickguard from the guitar. So on this occasion I've decided to replace this short ground wire with a new one, to make installing and removing the guitar's pickguard easier in the future, and reducing the risk of damaging the guitar when doing so. The bridge ground wire on a trem equipped strat is soldered to the trem spring claw in the back of the guitar. If you have a trem cover, you'll need to remove the 6 screws holding it on, revealing the spring mechanism of your trem system. As the trem claw's metal material can often be difficult to get to a suitable temperature to form a solid solder joint, I tend to remove it from the guitar. This is to remove any risk of burning the finish of the guitar due to accident with the soldering iron or with the hot metal claw afterwards. Removing it is simply done by un-attaching the springs, and unscrewing the two mounting screws.

I've removed and soldered on a new length of black 22AWG ground wire, fed the wire through the cavity and into the control cavity of the guitar ready to attach it to the harness.

Rather than add another solder joint to the back of the pot, I've simply soldered it alongside an existing joint, this time being the pickups ground wire I did earlier. This is just to keep things neat really, you'll thank yourself for doing this if you ever need to work on it all again in the future for any reason. Now that is done, that is everything all wired up and ready to be installed once and for all back into the guitar!
Step Nine - Re-fit the pickguard and test the harness!

Once you have re-fitted the pickguard to the body and fitted all of the mounting screws (making sure you haven't pinched any wires, is also worth noting), I would recommend a quick test before re-stringing to save having to remove new strings again. The guitar is safe to do this without the strings on, simply plug the guitar in to a little practice amp etc, and get a non magnetic tool and tap on the pickups briefly, working through each pickup selector position and also turning the volume and relevant tone controls too. If everything sounds like it functions correctly, restring and enjoy the new tones and your pickups breathing full of life for the first time!
I've really broke this down into more steps that it could have been, but I wanted to show the finer details, a well as showing how simple this is to do if you follow a step-by-step process. Fitting a pre-wired harness really does take out a big chunk of the work for you, keeping the install as quick as possible, and I've proudly made my Stratocaster harnesses since starting the Home of Tone in 2015.
To see my range of Pre-Wired Stratocaster harnesses check out the direct links below! -
Home of Tone Signature Series 'Modern' Stratocaster harness
Home of Tone Signature Series 'Blender' Stratocaster harness

For the most part, players opting to upgrade the wiring in their guitars are doing so on import models. I wanted to reflect that in this guide, so rather than get a USA made Strat for this demonstration, I've decided to show this process on an import instrument, this one in particular was a Strat copy by 'SX'. Why? Well very often there can be some little hurdles along the way with upgrading an import type instrument to USA spec components, which I'll cover in this guide. If you're fitting a new pre-wired harness to a USA built instrument, then the general processes will be the same, but there will be a couple less steps you'll need to do! Enjoy a sip of tea and a biscuit during those steps while the import guys carry on!
Recommended tools -
- 40w Soldering iron
- Lead free solder (I personally use Rapid 22SWG Lead-free 0.7mm diameter solder)
- Cross head screwdriver
- Wire cutters
- Small nose pliers
- 13mm socket
Always keep your soldering iron tip clean by using a damp sponge and/or if possible, some brass wool soldering iron tip cleaner. This ensures a good, clean solder joint.
Step One - Remove strings and pickguard screws.

About as simple as it gets here! Have your tools and new parts prepared and ready, makes life a lot easier than frantically looking for the screwdriver or reel of solder last minute all stressed out. Then remove all of the pickguard screws, jack plate screws, control knobs and switch tip. If you're keeping your existing pickups (like we are on this install) then you can leave the pickups mounted to your pickguard.

Here we have a first hint of the lower quality components we'll be replacing on this guitar. The pots on this are slim, 6mm shaft items, which is something we'll need to address in the following steps. Now you've removed all of the pickguard screws, control knobs and switch tip we can move on to step two.
Step Two - Removing loaded pickguard from the body

The bridge ground wire on this guitar was really short, so turning the pickguard over to inspect the existing harness was tight! I've decided I'm going to replace the bridge ground wire on this guitar to make doing this easier in the future, but for now, here we are looking at the original components. The bridge ground wire on this guitar is yellow, but for most brands it tends to be a black wire. Follow the wire that comes from the body to where it is ground on the existing harness, usually to the back of the volume pot like it was here. I'll be snipping that bridge ground wire at the pot end, ready to begin the removal of the original wiring.

To complete the process of removing the original loaded pickguard from the guitar to carry out the main harness swap, you'll need to snip the wires to the original jack socket. Lift out the jack plate, and simply snip the wires at the jack connections which will allow you to pull the jack wires through the body cavity and ultimately mean you can now lift out the full loaded pickguard from the body.
Step Three - Removing the pickup wires from the original switch

Now the pickguard is removed from the body, we can comfortable work on replacing the harness. I much prefer doing this away from the body of the guitar, it reduces the risk of any accidental damage to the guitar's body, as it can so easily be done. Dropping tools on it, getting solder marks, general surface scratches etc, it is much better if replacing the full harness to do it separate from the body which is great with a modular design like the Stratocaster as you can easily do this as demonstrated here.
The first step here is to remove the pickup wires from the original switch. On this guitar, we are retaining the original pickups, so I'll leave those mounted to the pickguard and simply follow the wires from each pickup to the existing 5 way switch. On this guitar they are easily identified by colour coded wires, but not all Strats will look like this. I'd usually just expect to see a white and black wire from each pickup, white usually denoting the Hot pickup wire, and the black for ground. But lots of pickup manufacturers use different colour codes. If you're unsure, a quick google search for your pickup manufacturers wiring colour codes will help you find the info needed. If it helps you when it comes to re-installing, you can label the wires too.
Simply snip the pickup wires right at the switch connector tab, and also snip the pickups' ground wire (usually ground at the back of the volume pot) which will then separate the pickups from the harness getting you ready for the next step.

Step Four - Removing the original harness from the pickguard and widening holes if required

Now we can remove the original harness in it's entirety from the pickguard. You'll need a screwdriver to remove the 2x screws mounting thr 5 way switch, and a small socket for removing the original 3 pots. I've added the photo above just as a side note, as you may note the pot is stamped 'B250k'. The B denotes that the volume pot is actually a Linear taper pot, which if you've played a guitar with a linear pot in the volume position before, it acts almost like an on/off rather than a gradual change in output volume. The human ear hears in a logarithmic pattern, so a linear change isn't as noticeable to us which is why many players (myself included) prefer to use logarithmic/audio taper pots in guitar's to help with gradual adjustment of volume and tone. So already it's very clear replacing these components is going to be a good upgrade over it's original items.

The original pickguard holes for the pots are quite small, and won't fit the new CTS pots on the upgrade wiring harness. So we'll need to widen the holes in the pickguard to fit the new harness correctly. I personally highly recommend doing this safely with a step cutter drill bit. This will cut the hole in the plastic much easier without the risk of tear out which could happen easily if using a normal drill bit. Normal drill bits can snag easily on plastic pickguards, so it's not worth risking damaging your pickguard and having to replace, if you can simply use a step cutter bit and do it right and accurately first time. You'll need to make the holes 10mm wide to facilitate the CTS pots. So I mark out the 10mm measurement on the step cutter bit with some masking tape, to help ensure I don't drill too far, and get to work!

The pickguard is now ready to mount the new upgrade pre-wired harness.
Step Five - Mounting the harness

As this is a relatively budget import guitar, and it's also going to be keeping the original pickups, it didn't really feel neccessary to go all out with a Signature Series spec harness, so we opted for an Entry Series here to provide a really high quality upgrade but with a couple of more wallet friendly options to suit the budget. The Entry Series for a Stratocaster features an Oak 5 way switch (as found on American made Fenders for example), Orange Drop 715P capacitor and Switchcraft mono jack socket (a quality industry standard component). The Signature Series would feature a CRL 5 way switch (often seen on Custom Shop Fender Instruments), USA made paper in oil capacitor and a Pure Tone multi contact jack socket (a quality, multi contact/improved surface connection). So a couple of options depending on your requirements and budget. Both feature my favourite CTS 'TVT' Series 250k audio taper pots and German made 22AWG wire as standard.
With the new harness mounted up, it's time to wire up the pickups and get it all back to one piece step by step!
Step Six - Re-Wiring the pickups to the new harness

If you labelled your pickup wires previously, then this step is nice and simple for you. As I mentioned previously, this guitar had a yellow, red and black outer sleeve for each pickup keeping it simple. But for many Strats it will be a white 'hot' wire for all three pickups, so it's best to work one by one to ensure you're wiring the correct pickup to the correct switch lug. I always start from neck pickup backwards, so let's see how that looks on the switch.

You'll notice on your pre-wired harness, that the side of the switch closest to the pots has already been soldered. Those go to the corresponding volume and tone pots. You'll see on the outer side of the switch, that three lugs are empty, these will be where you pickup hot wires are soldered to. Starting with the neck pickup's hot wire, I attach that the the right side empty lug. Then working to the left (as per photo's angle), it is then the middle pickups 'hot' next, and finally on the far left, the bridge pickups' hot wire.

Here are all three pickups' Hot wires now soldered to the switch. Now onto the ground wires. On this particular guitar, each pickup had some outer braiding for their corresponding ground wire, so I twisted all of those together ready to ground them to the harness. On other Strat types, you will usually see an individual black ground wire per pickup, these don't have to be wired in any order as they'll all just be soldered together, to ground.

On this guitar though, sadly the braided ground wire wouldn't reach the pots, so I needed to extend the wire suitably. I simply cut a length of black 22AWG wire, twisted it around the braided ground wires from all three pickups and soldered. To finish I simply added some heat shrink to help protect it. Then I was able to continue with soldering the pickup ground wire(s) to the back of the pot. As the nearest pot to this is the volume, most people solder it there, but you can of course solder this ground wire(s) to the back of any of the pots in the harness.

There we have it! The harness and pickups are now all wired up and ready to move onto the final stages of the install. You can now get the guitar body back on your work table, and place the loaded pickguard on the body. When you do so, you can feed the ground and hot wire for the jack socket through the small hole near the jack plate cavity, ready for the next step.
Step Seven - Wiring up the jack socket

Here we'll use a socket to remove the old, low quality jack socket, and install the new Switchcraft mono item.

For a normal, mono jack socket install, you'll see the jack socket has two lugs. One slightly larger, one smaller. The larger of the two is your hot connection, and the smaller is your ground. This is also shown on your wiring diagram supplied with the harness too. This is straight forward when you look closely at the jack socket, as you'll see the small lug is attached to the central part of the jack socket which is the grounding when the jack lead is plugged in. Attach the relevant wires to the correct lugs, and solder the joints. As with all solder joints, heat the joint first then apply your solder sufficiently.

You can now fit the jack surround plate to the body again with the two mounting screws, this section is now finished!
Step Eight - Soldering your bridge ground wire to the harness

If you remember back towards the beginning of this fitting guide, I mentioned that the original bridge ground wire was really short, making it difficult to remove the pickguard from the guitar. So on this occasion I've decided to replace this short ground wire with a new one, to make installing and removing the guitar's pickguard easier in the future, and reducing the risk of damaging the guitar when doing so. The bridge ground wire on a trem equipped strat is soldered to the trem spring claw in the back of the guitar. If you have a trem cover, you'll need to remove the 6 screws holding it on, revealing the spring mechanism of your trem system. As the trem claw's metal material can often be difficult to get to a suitable temperature to form a solid solder joint, I tend to remove it from the guitar. This is to remove any risk of burning the finish of the guitar due to accident with the soldering iron or with the hot metal claw afterwards. Removing it is simply done by un-attaching the springs, and unscrewing the two mounting screws.

I've removed and soldered on a new length of black 22AWG ground wire, fed the wire through the cavity and into the control cavity of the guitar ready to attach it to the harness.

Rather than add another solder joint to the back of the pot, I've simply soldered it alongside an existing joint, this time being the pickups ground wire I did earlier. This is just to keep things neat really, you'll thank yourself for doing this if you ever need to work on it all again in the future for any reason. Now that is done, that is everything all wired up and ready to be installed once and for all back into the guitar!
Step Nine - Re-fit the pickguard and test the harness!

Once you have re-fitted the pickguard to the body and fitted all of the mounting screws (making sure you haven't pinched any wires, is also worth noting), I would recommend a quick test before re-stringing to save having to remove new strings again. The guitar is safe to do this without the strings on, simply plug the guitar in to a little practice amp etc, and get a non magnetic tool and tap on the pickups briefly, working through each pickup selector position and also turning the volume and relevant tone controls too. If everything sounds like it functions correctly, restring and enjoy the new tones and your pickups breathing full of life for the first time!
I've really broke this down into more steps that it could have been, but I wanted to show the finer details, a well as showing how simple this is to do if you follow a step-by-step process. Fitting a pre-wired harness really does take out a big chunk of the work for you, keeping the install as quick as possible, and I've proudly made my Stratocaster harnesses since starting the Home of Tone in 2015.
To see my range of Pre-Wired Stratocaster harnesses check out the direct links below! -
Home of Tone Signature Series 'Modern' Stratocaster harness
Home of Tone Signature Series 'Blender' Stratocaster harness
Comments
Pakbet Roh said:
Very well detailed instructions with fantastic photos. I will use this for future reference.
Thanks!
Bryan Smith said:
Great description
Only thing on my prewired pick guard it is wired with the black wires from.each pup going to the switch and the yellow going to ground
All.workd OK but being a perfectionist I going thr change that as I would be happier knowing anything black is ground
James Gascoigne said:
Hi Bryan,
Thanks for the good words.
In all honesty, I would be weary of simply swapping the wires, you might be causing more hassle than it’s worth. Unless you plan on de-soldering each wire right at the pickup baseplate eyelets where they connect with the start and finish of the coil, and swapping them over there, then simply swapping them over where they solder at the pots and switch isn’t the best solution, all depends on the pickup polarity/wind direction, how it’s all currently wired or how the pickups have been made. Especially if it is only a colour thing for you. I must say though, I do agree that it is fairly odd for a pickup maker/brand to use black wires as signal, and a colour(this instant yellow) as ground, most do indeed follow a general rule of thumb of black being ground; so my gut feeling here is that the wires have been swapped/installed like that for a reason, perhaps they were correcting a polarity/phase conflict and needed to reverse the wires, pickups when made had the wires hooked up the wrong way etc. It’s opening a little bit of a can of worms that without personally inspecting or knowing exactly how they’ve been made is impossible for me to confidently provide you with a yes or no answer here. If you’re local, feel free to book the guitar in for an inspection :) or take to a local tech for them to assess.
James