An offset for the ages - MIJ J Mascis Jazzmaster
This was such a pleasure of a customer project to be part of. Friend and long time supporter of the Home of Tone, had this particularly well looked after, and to be honest, mint condition, MIJ (Made in Japan) J Mascis signature model Jazzmaster. As lovely as it's factory specs and stylings was, the owner fancied making it a little bit more 'his own' so to speak, with some choice, and very easily reversable mods and kindly asked me to help carry out said mods. But with the guitar here I thought I'd document some of the existing specs and unique features too, in case the closer look at the factory fresh guitar helped anyone out there with research or restoration perhaps.

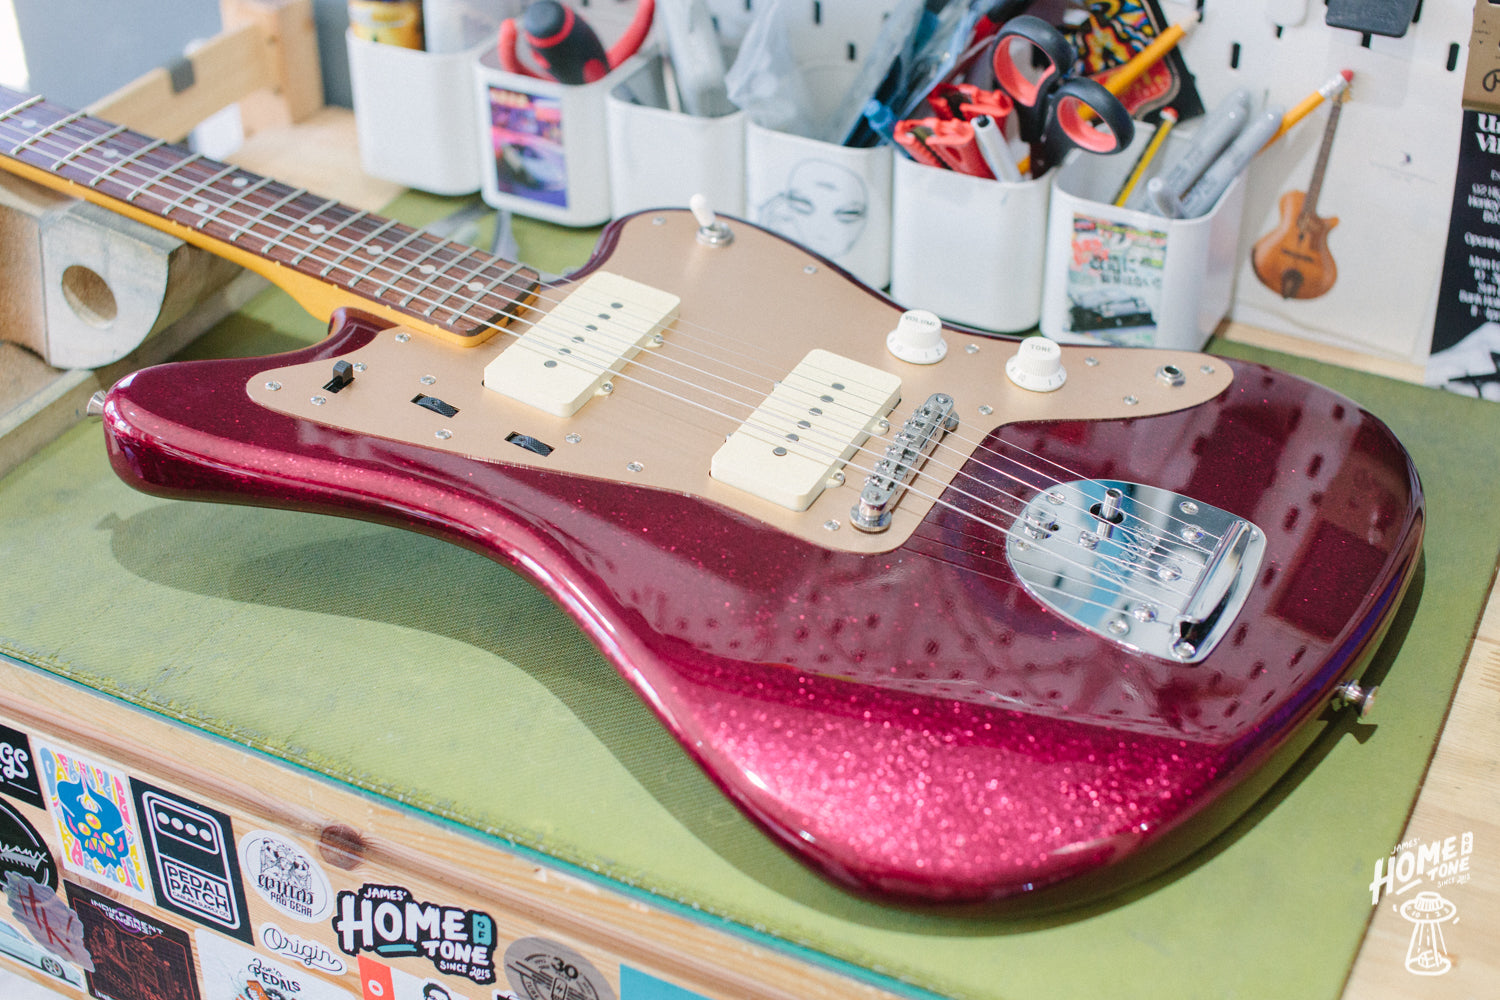
First of all, we simply have to kick things off with it's finish. An incredible colour that shifts it's shade depending on the light in the room or which direction you look at it from (making it quite hard to capture how it looks in photos to be honest). At times pink, purple or deep red, the super deep metal flake is simply one of the coolest finishes I've seen on a factory Fender model. Although it is quite clear from looking at it in person, that the top clear coat is pretty thick. Understandble I guess for the factory to achieve a nice quality flat finish over those pretty large flakes. That thick top coat does give it some real depth though, which I do personally really like. As I began to remove hardware, it was clear that the finish was applied over the entire body, including the main wiring and vibrato cavities, with the wiring cavities getting an additional factory black shielding paint coat or two.

Wiring is completely traditional JM specs, with a traditional rhythm circuit comprising of a 1MEG linear volume and 50k linear tone, wired together via a 0.022uF cap. The lead circuit seeing 1MEG linear volume with a 1MEG audio tone, paired with a 0.033uF cap. So if you like traditional sounding Jazzmasters, then this would help satisfy those preferences. Specs as expected from a MIJ Fender were all metric style, far eastern parts, from the slide switch, to toggle, jack and pots. All the kinds of quality/spec of parts we have come to expect from a MIJ, much like what you would see in a Squier JM too. Thankfully all the control cavities are also completely traditional in shape, layout and size so you could very easily 'upgrade' so to speak to USA spec wiring if you prefer.
As detailed in the photo above, all the wiring is mounted up to what I would say is a particularly thin, anodised aluminium pickguard. In person I would liken the colour more to rose gold than a copper or gold pickguard commonly seen, but it is certainly thin. Resulting in the rhythm/lead circuit slide switch sticking out quite a lot indeed. Easily resolved via some spacers though, which I'll feature below during the mods.

The tailpiece is the factory standard Japanese made version of the traditional Fender Vibrato. Main thing to help identify an MIJ vibrato over a USA made one for example is the 'trem-lock' button, on MIJ examples the button is chromed and has very squared off edges, whereas the USA version isn't chrome and has a more obvious bevelled edge. This unit works pretty well overall, but as it is a traditional style, the arm only places into the collet and doesn't secure in place. So can fall out with ease and you don't have much adjustability in terms of the swing tension too. There are mods you can do to 'fix' this, but that's the core design anyways.

The bridge is of course a Tune-o-matic, being the favoured spec by Mr J Mascis. But don't run away or scowl at it just yet, as upon checking it is in fact a correct (to fingerboard spec) 9.5" saddle radius. So in terms of setting up the guitar, consistent action across the fingerboard is very much achievable and I have no immediete concerns by this bridge. Interestingly, which I think is unique to this model over other Fender Jazzmasters equipped with a TOM, is that it is the more Gibson-esq ABR-1 (narrower design) and mounts to the body via the thinner threaded posts. Fender TOM's generally use the large posts which have threaded inserts pressed into the body. So this gives it quite a nice look I must say, and it is also ever so slightly offset with the treble side of the bridge sitting closer to the neck pocket than the bass side. Clearly not a production error upon drilling the body, this is by design and is reflected in it's unique pickgaurd also being drilled to match this post location. I did find during the setup process that this slight angle did indeed help the intonation, so overall no issues with seeing a TOM on this Jazzmaster at all. And very interesting to see the 9.5" ABR-1 here for sure.

So here's our first glimpse under the hood as I begin to strip down the parts.

Again, the usual kind of far eastern build Fender style components you'd expect to see, and certainly no issues being experienced with them (other than user preference, the turning torque was incredibly loose feeling on the lead circuit pots so a slight breeze would turn them) but in terms of functionality, they worked and no immediete need to replace unless there's issues. On this ocassion, I will be removing all of this factory wiring though, mainly for reliability and to bring the spec up to what the owners other favoured and modded J Mascis (Squier) Jazzmaster also has fitted. I will lift this all out in one piece, and keep it nice and safe attached to the pickguard too. At some point a prior owner had fitted SD Antiquity II pickups, all sounded good and certainly very traditional tonally. I sadly didn't get to hear what the guitar sounded like with the originals, but I did get to look at them in the case, and those too were traditional JM single coils, albeit with plastic coated wires instead of the SD's cloth.

With the original pickguard now off, I was intregued to see how much that bridge post placement differred to a conventional USA spec pickguard. I had one knocking around so lay it onto the body, overall outline was a really good match, so in theory would be a direct fit. But as you can see, the bass side post sat almost perfectly central to the bass side standard bridge thimble cutout. But on the treble side you can see how much further forward the MIJ Mascis bridge post for it's ABR-1 TOM sits. In theory, you could fit a USA pickguard to it, just be aware of these bridge holes, as standard they're larger so you may see a gap around the posts when it's all fitted. Whereas the original MIJ aluminium pickguard has neatly drilled, smaller diameter holes to match.

With the original pickguard off, I was onto the task of making a template. This is because we planned to have a custom black anodised aluminium pickguard made. We didn't want to risk shipping off the original guard in the post, seeing as sourcing a replacement would likely be darned tricky. So I made a template on a larger sheet of pattern paper, so the original guard could be kept here safely. With that template made, the template was posted off to get custom cut.

Completely standard dimension vibrato unit cavity, with the ground wire heading into it rather than the skinny bridge post. Main reason for the above photo was to show a little preventative work I did whilst the guitar was stripped down. These thick flake finish MIJ Mascis' are prone to finish damage. If they take a knock, you tend to see large chunks of finish flake off as a result, not ideal. Partly why most of these you see up for sale seem to have the odd chunk missing here and there. So as a bit of a preventative measure, I opted to countersink all of the wood screw holes, just to try and reduce the risk of chip out or shrinkage/expading during humidity changes that might cause lacquer splits and/or cracks. Won't be visible from the outside, but knowing the finish is nicely prepped underneath all the hardware, I figured was worth the effort and something I do on all fresh custom builds too for this same reason.

The reason for removing the vibrato unit though was to install a Descendant. It was decided to go for these over the many other great options today, is to try and capture some of the string tension feel of the owners Squier J Mascis which has been his main guitar for years now. If you're not already aware, the Squier Mascis features a different vibrato unit location, with it sitting quite a bit closer to the bridge compared to this vintage placement on the MIJ version. So to try and replicate that string tension, and overall feel (as well as having an arm that stays in place and can be adjustable) the Descendant was chosen. For reference, during the setup of this specific guitar, I ended up fitting the provided two spacers as the guitar could comfortable accomodate that full string anchor point drop and not foul the top plate or rear edge of bridge.


With the body stripped down of it's wiring, I set about making the new loom. For this it was essentially similar specs to the original (albeit with Switchcraft, CTS, Pure Tone and Gavitt branded parts) with only one key difference being the lead circuit tone cap value. A pair of the new CuNiFe Wide Range Humbuckers in JM mount were going into the project, and Fender recommended the use of a 0.1uF tone cap. This actually differs to their recommendations for the standard metal cover Tele sized CuNiFe WRH pickups, so I can only assume that this was perhaps down to the difference in covers, these being thin plastic as opposed to the thicker, larger metal covers on the Tele Deluxe sized version. I trusted the recommendation as it's a simple swap if it didn't quite sound right anyway, but that concern never arisen as it sounded wicked and tone pot taper great too.


Whilst waiting for the pickguard to be made, I started work on the frets, giving those an inspection and tidy up where needed. In all honesty, this specific example was really well made, and fretted. Neck stable, no twists or humps/dips along the board, and other than some very minor high spots on the frets, it was a nice and easy bit of work to tidy up. I suspect the very same jumbo fretwire is used on these as the Squier version, and to be honest I really do think the neck profile is the same too. I did briefly have the two guitars side by side but unfortunately, at the time didn't think to take measurements for reference. But from A/B'ing in feel alone, they certainly felt the same and both featured a similar amber lacquer tint and satin finish.

And here's the new pickguard! It arrived from the company who cut it from the template, and after a little bit of adjustment which I completely expected to need to do seeing as it was made from a drawing rather than the original guard, it was on and looking incredible already. We opted for a pair of black, bakelite witch hat control knobs, black switch tip, and stuck with the supplied Fender antique white pickup covers as it had so much character as a result. With black it lost a lot of detail.

Neck back on and everything tightened up ready to begin the setup. Factory top nut was kept as is, but refined for the new Stringjoy 11-50 string gauge. Time for some beauty shots -


The above photo shows the now recessed rhythm/lead circuit slide switch. Doing this still allows for easy actuation of the switch for sure, but removes the risk of accidental knocking during play. I quite like the visual too, making the switch look more like the roller wheel control knobs of the upper circuit too.

Black witch hat control knobs (these in particular for solid shaft pots, but I also stock split shaft suitable ones too) are available on the shop HERE


This one was great fun, really nice to have chance to get a closer look on these awesome, and unique MIJ Jazzmasters, and also carry out some really cool mods to make it more personal to the owner too. Here's to many more hours spent playing it now. Tonally certainly different to it's more traditional previous guise, but seriously good. Great mid-range from the WRH pickups, more grit which suited the change to Drop C tuning for it too. Still able to capture some Jazzmaster character, but it's own thing too. Plays beautifully well, if this specific guitar can be used as a reference point to other MIJ Mascis JM's out there, then this is one of the best production JM's I've had the pleasure of playing. Feels great, plays amazingly well and man does it look superb. The change to the Descendant did aid setup for this specific guitar due to it's tuning etc and desire to replicate the tension feel of his other Squier which has been the go-to guitar for years, though I suspect now it has a partner in crime with refined specs, that will be stringly contested! Awesome guitar, and a pleasure to work on.
James
First of all, we simply have to kick things off with it's finish. An incredible colour that shifts it's shade depending on the light in the room or which direction you look at it from (making it quite hard to capture how it looks in photos to be honest). At times pink, purple or deep red, the super deep metal flake is simply one of the coolest finishes I've seen on a factory Fender model. Although it is quite clear from looking at it in person, that the top clear coat is pretty thick. Understandble I guess for the factory to achieve a nice quality flat finish over those pretty large flakes. That thick top coat does give it some real depth though, which I do personally really like. As I began to remove hardware, it was clear that the finish was applied over the entire body, including the main wiring and vibrato cavities, with the wiring cavities getting an additional factory black shielding paint coat or two.
Wiring is completely traditional JM specs, with a traditional rhythm circuit comprising of a 1MEG linear volume and 50k linear tone, wired together via a 0.022uF cap. The lead circuit seeing 1MEG linear volume with a 1MEG audio tone, paired with a 0.033uF cap. So if you like traditional sounding Jazzmasters, then this would help satisfy those preferences. Specs as expected from a MIJ Fender were all metric style, far eastern parts, from the slide switch, to toggle, jack and pots. All the kinds of quality/spec of parts we have come to expect from a MIJ, much like what you would see in a Squier JM too. Thankfully all the control cavities are also completely traditional in shape, layout and size so you could very easily 'upgrade' so to speak to USA spec wiring if you prefer.
As detailed in the photo above, all the wiring is mounted up to what I would say is a particularly thin, anodised aluminium pickguard. In person I would liken the colour more to rose gold than a copper or gold pickguard commonly seen, but it is certainly thin. Resulting in the rhythm/lead circuit slide switch sticking out quite a lot indeed. Easily resolved via some spacers though, which I'll feature below during the mods.
The tailpiece is the factory standard Japanese made version of the traditional Fender Vibrato. Main thing to help identify an MIJ vibrato over a USA made one for example is the 'trem-lock' button, on MIJ examples the button is chromed and has very squared off edges, whereas the USA version isn't chrome and has a more obvious bevelled edge. This unit works pretty well overall, but as it is a traditional style, the arm only places into the collet and doesn't secure in place. So can fall out with ease and you don't have much adjustability in terms of the swing tension too. There are mods you can do to 'fix' this, but that's the core design anyways.
The bridge is of course a Tune-o-matic, being the favoured spec by Mr J Mascis. But don't run away or scowl at it just yet, as upon checking it is in fact a correct (to fingerboard spec) 9.5" saddle radius. So in terms of setting up the guitar, consistent action across the fingerboard is very much achievable and I have no immediete concerns by this bridge. Interestingly, which I think is unique to this model over other Fender Jazzmasters equipped with a TOM, is that it is the more Gibson-esq ABR-1 (narrower design) and mounts to the body via the thinner threaded posts. Fender TOM's generally use the large posts which have threaded inserts pressed into the body. So this gives it quite a nice look I must say, and it is also ever so slightly offset with the treble side of the bridge sitting closer to the neck pocket than the bass side. Clearly not a production error upon drilling the body, this is by design and is reflected in it's unique pickgaurd also being drilled to match this post location. I did find during the setup process that this slight angle did indeed help the intonation, so overall no issues with seeing a TOM on this Jazzmaster at all. And very interesting to see the 9.5" ABR-1 here for sure.
So here's our first glimpse under the hood as I begin to strip down the parts.
Again, the usual kind of far eastern build Fender style components you'd expect to see, and certainly no issues being experienced with them (other than user preference, the turning torque was incredibly loose feeling on the lead circuit pots so a slight breeze would turn them) but in terms of functionality, they worked and no immediete need to replace unless there's issues. On this ocassion, I will be removing all of this factory wiring though, mainly for reliability and to bring the spec up to what the owners other favoured and modded J Mascis (Squier) Jazzmaster also has fitted. I will lift this all out in one piece, and keep it nice and safe attached to the pickguard too. At some point a prior owner had fitted SD Antiquity II pickups, all sounded good and certainly very traditional tonally. I sadly didn't get to hear what the guitar sounded like with the originals, but I did get to look at them in the case, and those too were traditional JM single coils, albeit with plastic coated wires instead of the SD's cloth.
With the original pickguard now off, I was intregued to see how much that bridge post placement differred to a conventional USA spec pickguard. I had one knocking around so lay it onto the body, overall outline was a really good match, so in theory would be a direct fit. But as you can see, the bass side post sat almost perfectly central to the bass side standard bridge thimble cutout. But on the treble side you can see how much further forward the MIJ Mascis bridge post for it's ABR-1 TOM sits. In theory, you could fit a USA pickguard to it, just be aware of these bridge holes, as standard they're larger so you may see a gap around the posts when it's all fitted. Whereas the original MIJ aluminium pickguard has neatly drilled, smaller diameter holes to match.
With the original pickguard off, I was onto the task of making a template. This is because we planned to have a custom black anodised aluminium pickguard made. We didn't want to risk shipping off the original guard in the post, seeing as sourcing a replacement would likely be darned tricky. So I made a template on a larger sheet of pattern paper, so the original guard could be kept here safely. With that template made, the template was posted off to get custom cut.
Completely standard dimension vibrato unit cavity, with the ground wire heading into it rather than the skinny bridge post. Main reason for the above photo was to show a little preventative work I did whilst the guitar was stripped down. These thick flake finish MIJ Mascis' are prone to finish damage. If they take a knock, you tend to see large chunks of finish flake off as a result, not ideal. Partly why most of these you see up for sale seem to have the odd chunk missing here and there. So as a bit of a preventative measure, I opted to countersink all of the wood screw holes, just to try and reduce the risk of chip out or shrinkage/expading during humidity changes that might cause lacquer splits and/or cracks. Won't be visible from the outside, but knowing the finish is nicely prepped underneath all the hardware, I figured was worth the effort and something I do on all fresh custom builds too for this same reason.
The reason for removing the vibrato unit though was to install a Descendant. It was decided to go for these over the many other great options today, is to try and capture some of the string tension feel of the owners Squier J Mascis which has been his main guitar for years now. If you're not already aware, the Squier Mascis features a different vibrato unit location, with it sitting quite a bit closer to the bridge compared to this vintage placement on the MIJ version. So to try and replicate that string tension, and overall feel (as well as having an arm that stays in place and can be adjustable) the Descendant was chosen. For reference, during the setup of this specific guitar, I ended up fitting the provided two spacers as the guitar could comfortable accomodate that full string anchor point drop and not foul the top plate or rear edge of bridge.
With the body stripped down of it's wiring, I set about making the new loom. For this it was essentially similar specs to the original (albeit with Switchcraft, CTS, Pure Tone and Gavitt branded parts) with only one key difference being the lead circuit tone cap value. A pair of the new CuNiFe Wide Range Humbuckers in JM mount were going into the project, and Fender recommended the use of a 0.1uF tone cap. This actually differs to their recommendations for the standard metal cover Tele sized CuNiFe WRH pickups, so I can only assume that this was perhaps down to the difference in covers, these being thin plastic as opposed to the thicker, larger metal covers on the Tele Deluxe sized version. I trusted the recommendation as it's a simple swap if it didn't quite sound right anyway, but that concern never arisen as it sounded wicked and tone pot taper great too.
Whilst waiting for the pickguard to be made, I started work on the frets, giving those an inspection and tidy up where needed. In all honesty, this specific example was really well made, and fretted. Neck stable, no twists or humps/dips along the board, and other than some very minor high spots on the frets, it was a nice and easy bit of work to tidy up. I suspect the very same jumbo fretwire is used on these as the Squier version, and to be honest I really do think the neck profile is the same too. I did briefly have the two guitars side by side but unfortunately, at the time didn't think to take measurements for reference. But from A/B'ing in feel alone, they certainly felt the same and both featured a similar amber lacquer tint and satin finish.
And here's the new pickguard! It arrived from the company who cut it from the template, and after a little bit of adjustment which I completely expected to need to do seeing as it was made from a drawing rather than the original guard, it was on and looking incredible already. We opted for a pair of black, bakelite witch hat control knobs, black switch tip, and stuck with the supplied Fender antique white pickup covers as it had so much character as a result. With black it lost a lot of detail.
Neck back on and everything tightened up ready to begin the setup. Factory top nut was kept as is, but refined for the new Stringjoy 11-50 string gauge. Time for some beauty shots -
The above photo shows the now recessed rhythm/lead circuit slide switch. Doing this still allows for easy actuation of the switch for sure, but removes the risk of accidental knocking during play. I quite like the visual too, making the switch look more like the roller wheel control knobs of the upper circuit too.
Black witch hat control knobs (these in particular for solid shaft pots, but I also stock split shaft suitable ones too) are available on the shop HERE
This one was great fun, really nice to have chance to get a closer look on these awesome, and unique MIJ Jazzmasters, and also carry out some really cool mods to make it more personal to the owner too. Here's to many more hours spent playing it now. Tonally certainly different to it's more traditional previous guise, but seriously good. Great mid-range from the WRH pickups, more grit which suited the change to Drop C tuning for it too. Still able to capture some Jazzmaster character, but it's own thing too. Plays beautifully well, if this specific guitar can be used as a reference point to other MIJ Mascis JM's out there, then this is one of the best production JM's I've had the pleasure of playing. Feels great, plays amazingly well and man does it look superb. The change to the Descendant did aid setup for this specific guitar due to it's tuning etc and desire to replicate the tension feel of his other Squier which has been the go-to guitar for years, though I suspect now it has a partner in crime with refined specs, that will be stringly contested! Awesome guitar, and a pleasure to work on.
James