
How to Guide - Les Paul Re-Wire Pt.1 Removing cavity covers and original wiring loom
Let's dive right in, because we have already covered the tools we'll need in the main article HERE.
I highly recommend a nice clear workspace, dining table if the family allows, or if you have a dedicated workspace even better. You don't want to be banging elbows in a tight space, or running out of space to put parts. I also recommend having some spare tubs around, these are handy for putting parts in that you need to keep safe such as cavity cover screws or any wiring parts you happen to be re-using.

I would perhaps say doing this with the strings removed is easier, simply due to removing pickups etc if needed is easier with no strings on your LP. But you can still do a LP re-wire with the guitar strings still attached, I'll leave that up to you, but for me, I'm going to do this with the strings off.

So with that in mind, flip the guitar over so it's face down and get to work removing the control cavity covers.

You should find around 7 screws total holding the two control cavity covers in place. Remove those and the covers should lift off.


If they are a tight fit however, definitely don't try and pry them out as you could damage the finish on your guitar. quickest trick is to grab some sticky tape, masking tape etc, loop it and stick it to the cover then all being well that should be enough to lift it off.

Put the screws and covers into one of the storage tubs for safekeeping.

I would also use this opportunity to take a clear, or a few clear photographs of the existing wiring. For future reference, this can prove to be really helpful. Identifying pickup wire colours for example, doing this whilst it is all original is a great help if guitar wiring is new to you as you can easily refer back to it should you need to before making any changes.

This step might seem a bit odd, but you'll thank me in a few moments/steps time. Grab a cloth or similar and pop it into the cavity. All will be revealed in a moment!

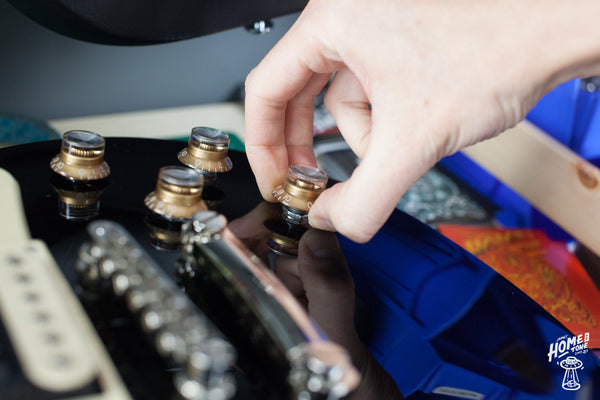
Now it's best to remove the control knobs, so turn the guitar over and if you have one, grab the multi spanner tool. I'm using the MusicNomad one which is absolutely superb as it has a soft pad on the underside to protect the finish when doing this little task. You can use your fingers to pry control knobs off the pot shafts, but sometimes they're on there super tight and it's hard to do.

These multi tools make life a lot easier and are really handy to have as a Les Paul owner for many other functions too such as tune-o-matic adjustments or tightening the switch toggle nut. But back to the pots. Slowly lift off each control knob and keep them safe if you're able to use them again depending on the existing sizes and what the new pot specs are. As I'm installing CTS pots into this Epiphone Les Paul which upon inspection has metric spec 18 spline pot shafts, I will be putting these smaller metric control knobs away as I'll need new imperial spec 24 spline control knobs at the end instead.

With those safely removed and the guitar this way up, I now usually loosen the pot and switch nuts.
Depending on what spec of pots are originally on the guitar, you may need a smaller socket like a 10 or 11mm to loosen the pot nuts, or if you have CTS/Bourns spec pots fitted then you'll need a 13mm socket to remove those.


For the toggle switch nut, which is a knurled item that won't fit a socket/spanner, you can either use the useful multi tool spanner the same as the one I used for removing the control knobs, or if you don't have one of those, you can use some fine tooth small nose pliers. Just take care with this method, perhaps place a cloth down on the guitar top between the pliers and the guitar to ensure you don't slip and damage the finish.

When you loosen the switch nut, some Les Paul's have 'poker chips' which are stuck down on the body like it was on this Epiphone, whereas some are just loose and are held in place by the tightened nut. So if it's one that is loose, pop that in the storage tub with your control cavity covers safe for when you need to re-fit it. Also place all of the nuts/washers you've just removed safely to one side, you'll need those again shortly.

With all of those loosened, I can now turn the guitar back over, just do this carefully as the components will now be loose but all being well, that cloth that you placed into the cavity will keep everything still and in place whilst you turn the guitar over with everything being loosened. Little tech tip but saves all the parts falling out as you loosen them and/or flip the guitar over.

So we've removed covers, loosened the mounting nuts and can finish this step off now by loosening the jack socket. Again, all depends on original specs here to which socket size you'll need, but loosen the jack mounting nut and pop that to one side with the others.

Now we can start with the wiring! You can approach this a couple of ways, either be using a soldering iron to remove each connection such as pickup wires, bridge ground wire and switch wires. Or you can grab your wire cutters and simply snip them right at the connection. I personally tend to do the latter, mainly because I really try not to work the soldering iron within a tight Les Paul cavity to reduce the risk of catching the cavity edge and burning it. As often as you do this, accidents can still happen, slight distraction etc and it's happened. That's just me being cautious really, you may find it easier. The amount of Les Paul's I've seen with burn marks around the control cavity from a hot soldering iron! Plus also, it can be a bit fiddly, but if you're confident and steady with an iron then you might just find it easier to remove all the wires by heating the joints.

Things were a bit of a mixed bag for me with this particular job as the guitar had quick connects for the switch and pickup wires, but some wires were soldered as normal such as the bridge ground wire. This demonstrates the variety of possible hurdles along the way during guitar work, until the covers are off you don't really know what specs or wiring methods you'll be finding. PCB boards, metric or imperial spec components, soldered connections, different pickup wiring styles. But hopefully in an attempt to discuss some methods here it will help no matter what you're original wiring is.
So work methodically here, start by identifying which wires are which. I would perhaps start with the neck volume pot and remove the pickup 'hot' wire which is usually going to the volume pot input lug. Then it's respective ground wire which is usually soldered to the pot casing. I unfortunately for demo purposes here have an Epiphone which features quick connectors, so for me I just unplug them! So along with some photos of this guitar, I'll share a photo example from a SG re-wire job that shows plastic coated pickup and switch wires soldered to the volume pot in the more traditional manner.

Then the same for the wire coming from the switch, depending on original wiring specs, this may be plastic coated or a traditional braided wire type, but the same rules apply. You'll likely find that the main signal wire going to the switch is attached to the volume pot's 'output' middle lug with the switch ground wire again attached to the pot casing, but it could also be attached to a different pot casing.
Do the same for the bridge volume pot, identify the pickup wires, then the switch wires and remove those. If the pickup wires aren't obviously discernible, you could use this opportunity to label or mark the leads to make life easier when you come to wire them back up. IE mark which is the neck pickup and which is the bridge pickup.
On this particular guitar, the bridge ground wire (the wire than comes from the bridge body thimble to ground the strings whilst in use) is soldered to the only non push-pull pot which is the bridge tone pot. I've decided just to snip this wire to remove it from the pot casing but you can of course de-solder it by grabbing your soldering iron, warming the solder joint and lifting the wire away. Again, just be careful of you guitar's finish/cavity edge.

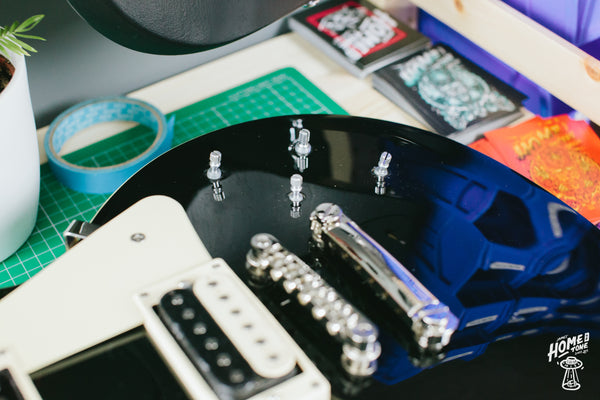
This is now our first glance at the thickness of the top, which will help us decipher whether the guitar requires long or short shaft pots, and also a glance at the pot hole diameter. Interestingly, this particular Epiphone had three metric sized pot mounting shafts meaning three of the holes were smaller 9mm holes and one imperial sized pot meaning one hole is actually already sized at 10mm for us to install a replacement imperial spec CTS pot straight in. So for this guitar, I can technically use short shaft pots as they will be perfectly fine for the thinner top, but if needed I can also fit long shaft pots and space them using the additional mounting nuts/washers.
Things were relatively painless for me on this guitar due to the quick connects, but must admit they were still fiddly to pull away from the mini PCBs. If you're planning on using the original pickups when you come to re-wire, those will obviously create another challenge due to most harnesses or re-wires won't be using those. So I'll address removing quick connects and identifying the wire colours for more traditional soldered connections upon the re-wiring stage. for now though, I am actually planning on installing different pickups into this guitar, so with all the pots now out of the guitar, and to make removal of the switch loom a bit easier, I am going to turn the guitar back over and remove the pickups from the body.

To remove the pickups, I would recommend removing the 4 (per pickup) outer corner mounting ring screws. Un screw those and pop them in the storage tub with the other saved fixings. With that done you should now be able to lift the pickup away from the body whilst allow the wire to feed back through from the cavity and out the guitar. I would remove the bridge pickup firstly, then the neck pickup.


There we have it! First stage of a full re-wire complete with the control plates and original wiring all removed safely from the guitar. If done neatly too, chances are the original components are all of decent condition to safely keep in case you happen to wish to restore it back to original specification, or if you plan on selling the guitar you have original parts available.

For the next stage I'll be demonstrating how to safely widen the holes in the body to accommodate the imperial size pots. For that guide, please click HERE!
James.
I highly recommend a nice clear workspace, dining table if the family allows, or if you have a dedicated workspace even better. You don't want to be banging elbows in a tight space, or running out of space to put parts. I also recommend having some spare tubs around, these are handy for putting parts in that you need to keep safe such as cavity cover screws or any wiring parts you happen to be re-using.
I would perhaps say doing this with the strings removed is easier, simply due to removing pickups etc if needed is easier with no strings on your LP. But you can still do a LP re-wire with the guitar strings still attached, I'll leave that up to you, but for me, I'm going to do this with the strings off.
So with that in mind, flip the guitar over so it's face down and get to work removing the control cavity covers.
You should find around 7 screws total holding the two control cavity covers in place. Remove those and the covers should lift off.
If they are a tight fit however, definitely don't try and pry them out as you could damage the finish on your guitar. quickest trick is to grab some sticky tape, masking tape etc, loop it and stick it to the cover then all being well that should be enough to lift it off.
Put the screws and covers into one of the storage tubs for safekeeping.
I would also use this opportunity to take a clear, or a few clear photographs of the existing wiring. For future reference, this can prove to be really helpful. Identifying pickup wire colours for example, doing this whilst it is all original is a great help if guitar wiring is new to you as you can easily refer back to it should you need to before making any changes.
This step might seem a bit odd, but you'll thank me in a few moments/steps time. Grab a cloth or similar and pop it into the cavity. All will be revealed in a moment!
Now it's best to remove the control knobs, so turn the guitar over and if you have one, grab the multi spanner tool. I'm using the MusicNomad one which is absolutely superb as it has a soft pad on the underside to protect the finish when doing this little task. You can use your fingers to pry control knobs off the pot shafts, but sometimes they're on there super tight and it's hard to do.
These multi tools make life a lot easier and are really handy to have as a Les Paul owner for many other functions too such as tune-o-matic adjustments or tightening the switch toggle nut. But back to the pots. Slowly lift off each control knob and keep them safe if you're able to use them again depending on the existing sizes and what the new pot specs are. As I'm installing CTS pots into this Epiphone Les Paul which upon inspection has metric spec 18 spline pot shafts, I will be putting these smaller metric control knobs away as I'll need new imperial spec 24 spline control knobs at the end instead.
With those safely removed and the guitar this way up, I now usually loosen the pot and switch nuts.
Depending on what spec of pots are originally on the guitar, you may need a smaller socket like a 10 or 11mm to loosen the pot nuts, or if you have CTS/Bourns spec pots fitted then you'll need a 13mm socket to remove those.
For the toggle switch nut, which is a knurled item that won't fit a socket/spanner, you can either use the useful multi tool spanner the same as the one I used for removing the control knobs, or if you don't have one of those, you can use some fine tooth small nose pliers. Just take care with this method, perhaps place a cloth down on the guitar top between the pliers and the guitar to ensure you don't slip and damage the finish.
When you loosen the switch nut, some Les Paul's have 'poker chips' which are stuck down on the body like it was on this Epiphone, whereas some are just loose and are held in place by the tightened nut. So if it's one that is loose, pop that in the storage tub with your control cavity covers safe for when you need to re-fit it. Also place all of the nuts/washers you've just removed safely to one side, you'll need those again shortly.
With all of those loosened, I can now turn the guitar back over, just do this carefully as the components will now be loose but all being well, that cloth that you placed into the cavity will keep everything still and in place whilst you turn the guitar over with everything being loosened. Little tech tip but saves all the parts falling out as you loosen them and/or flip the guitar over.
So we've removed covers, loosened the mounting nuts and can finish this step off now by loosening the jack socket. Again, all depends on original specs here to which socket size you'll need, but loosen the jack mounting nut and pop that to one side with the others.
Now we can start with the wiring! You can approach this a couple of ways, either be using a soldering iron to remove each connection such as pickup wires, bridge ground wire and switch wires. Or you can grab your wire cutters and simply snip them right at the connection. I personally tend to do the latter, mainly because I really try not to work the soldering iron within a tight Les Paul cavity to reduce the risk of catching the cavity edge and burning it. As often as you do this, accidents can still happen, slight distraction etc and it's happened. That's just me being cautious really, you may find it easier. The amount of Les Paul's I've seen with burn marks around the control cavity from a hot soldering iron! Plus also, it can be a bit fiddly, but if you're confident and steady with an iron then you might just find it easier to remove all the wires by heating the joints.
Things were a bit of a mixed bag for me with this particular job as the guitar had quick connects for the switch and pickup wires, but some wires were soldered as normal such as the bridge ground wire. This demonstrates the variety of possible hurdles along the way during guitar work, until the covers are off you don't really know what specs or wiring methods you'll be finding. PCB boards, metric or imperial spec components, soldered connections, different pickup wiring styles. But hopefully in an attempt to discuss some methods here it will help no matter what you're original wiring is.
So work methodically here, start by identifying which wires are which. I would perhaps start with the neck volume pot and remove the pickup 'hot' wire which is usually going to the volume pot input lug. Then it's respective ground wire which is usually soldered to the pot casing. I unfortunately for demo purposes here have an Epiphone which features quick connectors, so for me I just unplug them! So along with some photos of this guitar, I'll share a photo example from a SG re-wire job that shows plastic coated pickup and switch wires soldered to the volume pot in the more traditional manner.
Then the same for the wire coming from the switch, depending on original wiring specs, this may be plastic coated or a traditional braided wire type, but the same rules apply. You'll likely find that the main signal wire going to the switch is attached to the volume pot's 'output' middle lug with the switch ground wire again attached to the pot casing, but it could also be attached to a different pot casing.
Do the same for the bridge volume pot, identify the pickup wires, then the switch wires and remove those. If the pickup wires aren't obviously discernible, you could use this opportunity to label or mark the leads to make life easier when you come to wire them back up. IE mark which is the neck pickup and which is the bridge pickup.
On this particular guitar, the bridge ground wire (the wire than comes from the bridge body thimble to ground the strings whilst in use) is soldered to the only non push-pull pot which is the bridge tone pot. I've decided just to snip this wire to remove it from the pot casing but you can of course de-solder it by grabbing your soldering iron, warming the solder joint and lifting the wire away. Again, just be careful of you guitar's finish/cavity edge.
This is now our first glance at the thickness of the top, which will help us decipher whether the guitar requires long or short shaft pots, and also a glance at the pot hole diameter. Interestingly, this particular Epiphone had three metric sized pot mounting shafts meaning three of the holes were smaller 9mm holes and one imperial sized pot meaning one hole is actually already sized at 10mm for us to install a replacement imperial spec CTS pot straight in. So for this guitar, I can technically use short shaft pots as they will be perfectly fine for the thinner top, but if needed I can also fit long shaft pots and space them using the additional mounting nuts/washers.
Things were relatively painless for me on this guitar due to the quick connects, but must admit they were still fiddly to pull away from the mini PCBs. If you're planning on using the original pickups when you come to re-wire, those will obviously create another challenge due to most harnesses or re-wires won't be using those. So I'll address removing quick connects and identifying the wire colours for more traditional soldered connections upon the re-wiring stage. for now though, I am actually planning on installing different pickups into this guitar, so with all the pots now out of the guitar, and to make removal of the switch loom a bit easier, I am going to turn the guitar back over and remove the pickups from the body.
To remove the pickups, I would recommend removing the 4 (per pickup) outer corner mounting ring screws. Un screw those and pop them in the storage tub with the other saved fixings. With that done you should now be able to lift the pickup away from the body whilst allow the wire to feed back through from the cavity and out the guitar. I would remove the bridge pickup firstly, then the neck pickup.
There we have it! First stage of a full re-wire complete with the control plates and original wiring all removed safely from the guitar. If done neatly too, chances are the original components are all of decent condition to safely keep in case you happen to wish to restore it back to original specification, or if you plan on selling the guitar you have original parts available.
For the next stage I'll be demonstrating how to safely widen the holes in the body to accommodate the imperial size pots. For that guide, please click HERE!
James.